
Filing Carbon:
- Use the sharpener to make a graphite rod with 1cm tall and thin extending tip.
- Sharpen it very smoothly.
- File the side of the thin part using a sand paper by rotating the graphite rod then file it using a regular paper.
- File the tip using only regular paper (very gently).
- Make a flat graphite rod by filing the edge of another graphite rod using sand and regular paper.
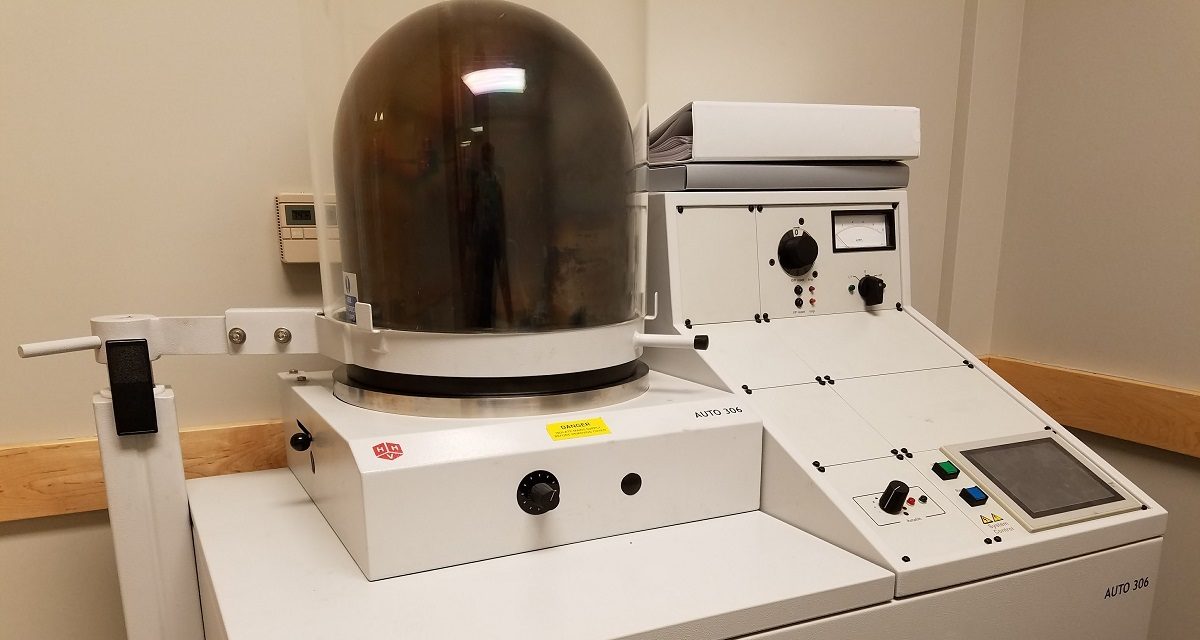
Carbon Coater Operation:
- Put your gloves on (You do not want to contaminate the chamber with grease on your hand).
- Push I/O button (to turn on the carbon coater).
- The water pump should be on (if not turn the right lever towards up).
- Click “Reset” on the instrument panel.
- If the chamber is under pressure (It should be), click “Vent” on the screen.
- Open the latch (on the left side of the machine) while holding down from the edge. Wait for the chamber cover to pop up. (1x10³ MBar)
- Immediately seal off the columns by clicking “Seal” on the screen.
- Open the chamber, push it back towards left.
- Locate the screen away using the knob on the left side of the chamber.
- Loosen the graphite holders (anti-clockwise while facing from outside) using the small pin.
- Take out the old graphite using the long hex tool by inserting it into each hole spans the graphite holders. Push out the graphite rods.
- Air dry the chamber to remove dust. (Avoid blowing close to the columns - columns should be sealed off.)
- Place flat graphite first to graphite holder on right. Insert is until it reaches to the middle using long hex tool. Tightenthe holder.
- Place needle like graphite to the left graphite holder. Insert it until touches the flat one. Hold back the spring almost to the end (4/5), push needle like graphite more until it touches to the flat graphite.
- Tighten the left graphite holder while holding the spring.
- Place the screen in the middle of the chamber.
- Blow the dust again.
- Put your grids right below the graphite holders, place glass slides to the edges of the filter paper to fix it, protect your grids from dust.
- Close the chamber and make sure to seal it well (Check the edges of the chamber while pushing the chamber cover down to center it).
- Lock the latch while holding down from the edge. Make sure again that the gasket of the chamber cover is sealed and centered well.
- Click “Start” on the screen. Wait until Turbo Pump is ready (10-4 Mbar).
- “Cycle” button on the screen will be enabled, click “Cycle”.
- After “fine pumping” - turn the knob to LT.
- Turn voltage adjusting knob slowly to 1 to see a small glow to make sure everything is set up properly. Turn the knob back to “0”.
- Wait for about an hour for vacuum to be ready (2-4 x 10⁻⁶ Mbar).
- Click “Seal” on the screen to seal the columns.
- System Status: Chamber sealed ~4x10⁻³ Mbar
- Turn the knob to LT.
- Very slowly turn the voltage adjustment knob up to 3.
- When you see the outgassing, turn the voltage adjustment knob back to around 2.1-2.2. Adjust the voltage to keep the glow steady.
- Remove the screen. Carbon coat your grid until the circuit breaks or about 1 minute, keeping the glow steady by adjusting the voltage.
- Turn back voltage knob from “LT” to “0”.
- Click “Vent” on the screen. Open the latch while holding down from the edge and wait until the chamber pops up.
- Open the chamber, take out the glass slides. Take out the grids using a tweezer. (Bending of the filter paper may dislocate the grids)
- Close the chamber well, lock the latch.
- Click “Cycle” on the screen, wait until vacuum to reach 10-3-10-4
- Click “Seal” on the screen - pressure will drop to 4x10⁻³
- Click “Stop” on the screen, wait until Turbo Pump stops.
- System Status from Turbo decelerating to Standby
- Push I/O to turn of the carbon coater.
- Keep the water valve on unless instructed otherwise.

